Hi all, ccjx here. I'm pretty sure that I've been introduced sometime in the past but I haven't found the time to write or the time to think of what to write since then. Well, today I have finally thought of what to share with the people reading this site.
For those of you who have an iPhone or an iPod Touch (which I will refer to as iPhone from now on as it is probably more common) and would really like to get some videos that you have on your computer onto it, you've found the right place =).
For the others who wish to convert DVDs into a format that the iPhone will be able to read, do look forward to future guides from me. =)
OK, I will be covering how to use Videora Video Converter in this guide. You can get it at www.videora.com. The author has tons of versions (iPhone converter, iPod touch converter, iPhone 3G converter) and I'm pretty sure he's gonna come out with an iPod touch 2G converter soon but all of them are the same program (from what I know). So just pick one that you like and download it. I'm assuming you know how to install it so I'll skip straight to the program.

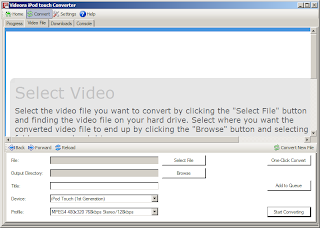
2. You could choose Normal Mode but you wouldn't learn anything about video conversion so pick Power Mode. You should see the following screen.

3. The options displayed below are:
File - The file that you want to convert. In other words, your source.
Output Directory - The folder that you want your video (mp4) to output to. In other words, your target.
Title - The title that you want displayed on your iPhone's screen when this video is displayed on the menu.
Device - Select the device that you are currently converting for. Note that the format will most probably be compatible over all iPhones and iPod touches if you pick the right settings.
Profile - This is the profile that will be used to convert the video. I will explain what the whole stretch of letters mean.
One profile that you can select is: MPEG4 480x320 768kbps Stereo/128kbps
MPEG4 - This is the codec that you will be converting to. Another choice is H.264. Just know that MPEG4 is lossy and H.264 is lossless, MPEG4 converts faster than H.264 and that H.264 looks better than MPEG4. All of the above only apply when the bitrates are the same.
480x320 - This is the size of the video. 480 pixels wide by 320 pixels tall. The iPhone screen is exactly this resolution so it should be sufficient. If you are using a TV output cable, you might want to select a profile that says VGA (640 x 480).
768kbps - This is the bitrate of the video. The kbps here refers to kilobits per second, not kilobytes. Basically, this is how much "space" the video has per second to store its data. Simply put, the more "space", the better the quality. Of course, it depends on the source of the video as well. Choose a lower bitrate than 768kbps to lower the filesize (and quality at the same time).
Stereo/128kbps - This is the part that talks about the audio. Stereo is self-explanatory. 128kbps is the bitrate of the audio stream.
Certain profiles also have 2-Pass or Advanced. I'm not quite sure about Advanced. 2-Pass stands for 2-Pass encoding. Which means that the encoder will go through the movie twice. Once to calculate which parts of the video has a lot of motion or movement (which will probably need more bitrate) and lower or increase the bitrate for that part of the video accordingly. Then only during the second pass will the encoder actually encode the video.
4. All right, now that I've explained the various parts, go ahead and click on Select File to pick your video. Then click on Browse if you want to change where the video output goes to. Then click on Start Converting.
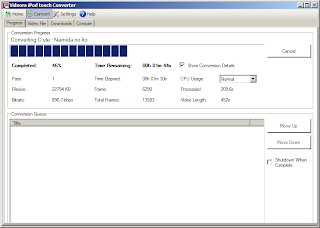
You will now get a screen that says Conversion In Progress. With two options, View Conversion Progress and Convert Video File. The latter choice will bring you back to the previous page where you can select another video to queue behind the currently converting one. The former will bring you to the status page.

5. If you check Show Conversion Details you will get the same screen as mine with all the various bits of information which you don't really have to know. But I will explain them anyway.
Completed - The percentage that the video file has completed converting.
Time Remaining - How much time left before the video finishes converting.
Pass - It should be 1, unless 2-Pass is selected, in which case it will show you which pass the converter is on.
Time Elapsed - How much time has passed.
CPU Usage - The priority of the CPU for the converter. You should probably leave it at Normal. Lower it if you need to do something else and the converting is lagging your computer.
Filesize - The filesize of the output file.
Bitrate - The bitrate of the current output.
Frame - The frame that the converter is converting. For those who don't know, frames are also known as pictures. For a 30fps video, each second has 30 frames.
Total Frames - The total number of frames the video has.
Processed - The length of video processed, in seconds.
Video Length - Total length of the video being converted.
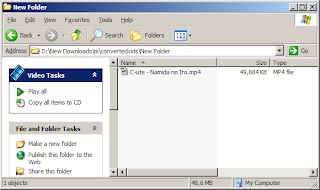
6. Finally when the converter says that it is complete, go get your video file =).

It should have an .mp4 extension. This concludes the iPhone video conversion guide. =).
You do know how to put it into your iPhone right? ... ... Right......?


No comments:
Post a Comment